Because of our deadline is near, we decided last Tuesday that I should focus on the temporal form, and Anne should focus on the physical form. She should sew the led strip and sensors into the glove, while I created the coding.
The first thing I did was to figure out how I would create the code, with the desired sensors and light.
To make it easy for myself, I decided to make the simplest interaction first, with fewest components, and when it works, I will build upon it.
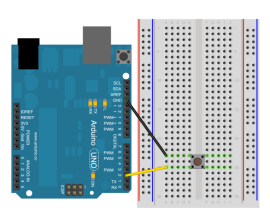
The first thing I needed to do was to make the pressure sensor turn on a led. This code was very simple, as I used the given course code, Button-Pullup. Hereafter I removed the button and replaced the pressure sensor. Now I can turn on a led with the pressure sensor.
But because we have decided that we want to have all our components stitched into our glove, I wondered if we could use a button without a pull-up resistor, as it uses a lot of components and space.
After some research, I found out that the Arduino has a build in pull-up resistor, INPUT_PULLUP, which means I can connect the pressure sensor directly to a digital pin, and ground, without having to use two resistors and 5V.
Hereafter I am looking into how the light should work and reacted when the pressure sensor is activated.
Last Tuesday we went down to talk to Halfdan in the intermedia lab, and he gave use a Ledstrip which we could use. It meant that I needed to figure out how we could control the led strip.
I figured that three states would be fitting for the light, to create the interaction we want. A stage where no light is turned on, a stage that turns the LEDs on, one at a time (to give a time aspect), and a pulsating stage that creates a puls between the users.
Here I went to find some inspiration on the internet.
I found a great site, which had a code, and a lot of LEStrip effects, I could use to find an effect that fits our need. https://www.tweaking4all.com/hardware/arduino/adruino-led-strip-effects/
Video show examples of effects, I tried out, and by exploring different physical forms.
By creating this simple prototyping form, and by exploring the temporal form, I could explorer different lights which I felt gave the desired effect.
The last clip on the video, shows the effects, that I went with. It creates the loading state, called ‘colorwipe,’ which give a feeling that time matters with the interacting, what happens when the light reaches the end? And hereafter the pulsating effect, called ‘meteor rain’ which gives a feeling of creates a connection, and giving something to the object or user that is touched.
The only problem is that the loop is faked. I couldn’t figure out, how to make the first effect and then run the other. What I thought was happening, was that the first action ‘colorwipe’ and the second action was run at the same time.
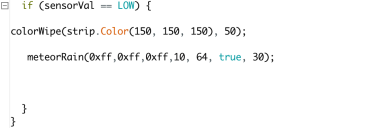
I tried to create a for-loop, but for some reason, it did not work.
What I believe we need to do is to use the function, Milli. But we only had one week left, and as it would take a lot of time, we may need to consider to only use the ‘meteor rain.’
It was quite frustrating as I felt very alone with the temporal form, as none of the others in the group could help. I believe that Anna Vallgårda’s conceptualizing computers as a design material is a great idea. But it needs demand on the design team, that is not described in her text. Everybody needs to understand code, and minimum one needs to have coding skills.
What I decided to do was to speak with my group members, to make sure that these light effects were the one we wanted, make sure it worked with the sewn glove, and then figure out what to do.
